
Questions
Enviro Data only comes in 64-bit and Windows 11 also is only 64-bit..
Geotech will provide you with a link to download the program files. Installation instructions will be provided with the link, and they will vary depending on whether you are provided with an installer (.EXE) or a compressed file (.ZIP). Typically, an upgrade for our installed program will be in the compressed .zip format. You can also visit our Support Chatbot & FAQ page at https:\\geotech.com\support\faq for more information.
You will need a copy of Microsoft Office installed and Geotech recommends the current version of Office Pro or Microsoft (Office) 365 64-bit running in Windows 10 or Windows 11. Neither Microsoft nor Geotech supports Windows 7, 8, 8.1 or Office 2013 or Office 2016. While Enviro Data may still work on earlier versions of both Windows and Office, they will not be getting feature and/or security updates. Support for Windows 10 expires on October 14, 2025, and that includes Office programs running on Windows 10. See Microsoft’s End of Support Resources page at https://docs.microsoft.com/en-us/deployoffice/endofsupport/resources for more information.
Note that once you download Office, you may need Administrator privileges to run the Setup programs both for Office and Enviro Data.
Instructions to Install the Zip File
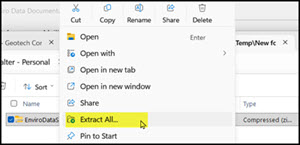
After downloading the zip file right-click on it and choose Exract All.
In the pop up. In Files to be extracted to folder put in C:\ and click Extract
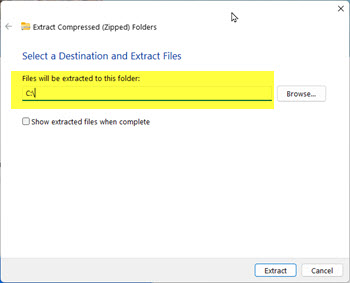
This will create the folders needed and copy all the files and folders needed from the zip into the Enviro Folder.
Copy the two shortcut files from the Enviro\EData8\Shortcuts folder onto your desktop.
Now skip down to After Installation below.
Installing using an EXE file
Since Enviro Data and some other programs from smaller software publishers like Geotech are not frequently seen, Windows will warn you that is could be malicious. To work around this follow the instructions below for downloading with Edge. The instruction for Chrome and other browsers should bs similar.
- Click the download link for the file.
- When the warning appears stating the app is not commonly downloaded, click the three dots (...) next to the download.
- Select Keep.
- On the confirmation prompt, click Show more and then select Keep anyway.
- Once the file finishes downloading, open it by double-clicking on it.
- If Windows Defender or SmartScreen shows a "Windows protected your PC" blue screen, click More info and then click Run anyway.
- Accept the User Account Control (UAC) prompt by clicking Yes to begin installation. [1]
Once the installation starts, you may get the normal Windows User Account Control warning about an unknown program. Click Yes to continue the installation. Finally, if you already have Enviro Data on your computer, if asked, make sure you choose Repair Install and Enviro Data will complete the installation. The installation will place shortcut icons on your desktop for both the Editor and Viewer.
After Installation
You must make the Enviro folder a trusted location in Access and this folder must have Read/Write permissions for the user. See the FAQ on Do I need Read/Write privileges in the Enviro Data. Trusted Locations will need to be set up in Access. For insormation on this please see How do I set up Trusted Locations in Access?
Open the Editor first. If this is a new install, you will see a message about entering your license key and follow the instructions to license Enviro Data.
Next go to Attach Database and attach to your production database. You will also need to do this with the Viewer
You may also need to Refresh your Desktop to display the correct Enviro Data icons. This can be done by a mouse click on the Desktop and pressing F5.
The first time you open both the Editor and Viewer, a bar along the top may read, "Some active content has been disabled" will appear. Click on the bar, select Enable Content and the message will go away. You only need to do it once for each program.
After installing an update to Enviro Data, the database table structure may need to be updated to the current version. See What are the steps to upgrade an Enviro Data database to a newer version?
Also, the first time you open the Editor and/or Viewer a message may display informing you that the Settings file needs to be updated. Click OK, this update takes only a few seconds to complete.
Additional Installation Information
During the install, an example database called EnvDData8.mdb is copied into the program folder. Enviro Data connects to this database by default when it is first opened, if you have accepted the default program paths during installation. If you have installed the program and sample database in a different folder, you will need to locate the settings file and the database file. Contact Geotech if you have any trouble with this.
For help getting started see the Learn Section on both the Editor and Viewer main screens.
Note that if you were using Enviro Data 2012, Version 8 installs into a different directory (C:\Enviro\EData8) and does not change the 2012 installation.
There are several issues you need to be aware of before, during or immediately after installing Enviro Data.
Installing
You may need Windows security permissions to install Enviro Data. If you receive an InstallShield error like the one below, this is likely a Windows issue. Check with your IT Department as they may have to install the program for you.
During the install, a sample database called EnvDData8.mdb is copied into the program folder, C:\Enviro\EData8. Enviro Data connects to this database by default when it is first opened. You can use this database to take the Tour in both the EDITOR and the VIEWER to learn how to use the program.
After Installation
The Enviro Data installation should add desktop icons for both the EDITOR and the VIEWER. Sometimes these icons are hidden and may not display. To correct this either right click on the desktop and select Refresh or push F5 on your keyboard to restore them. (You may be asked to enter your Window's credentials when you do this.)
Open the Editor first. You may see a display a bar shown below. Click on the bar, select Enable Content, then Enable All Content and this message will go away. You only need to do this once for each program. If the bar is partly obscured by the splash screen, you can wait a few seconds and then dismiss it.

Next, you will be asked to enter a software key to license the program. You should have received this key when you purchased Enviro Data. If the key you have been given is for a concurrent license, you will need to follow the instructions to set that up.
If you do not enter a key and leave this form blank, you are given a seven day license until the program stops working. If you are evaluating Enviro Data and need more time, you can contact Geotech for a code to extend your evaluation to 30 days at no charge.
If the folders you will be using with Enviro Data and its database, you will need Read\Write privileges to access them. See the FAQ in this section on Do I need Read/Write privileges in the Enviro Data
Like Read\Write access above, you must also enable Trusted Location in Access. You can do this by following these instructions. Trusted Locations by following the steps.rusted Locations by following the steps.
Trusted Locations will need to be set up in Access. For insormation on this please see How do I set up Trusted Locations in Access?
Trusted Locations need to be configured in Access in order for Access to read and write to each folders used by Enviro Data.
While the example below shows the default location, if you have other folders including those on a VM that Enviro Data needs to access. these folders must also be Trusted.
1. In the top left of the Access menu, click File.

2. Click Options.
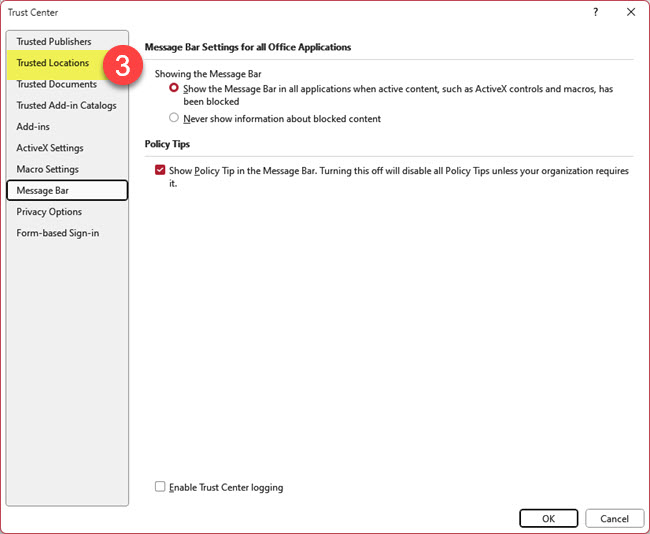
3. In the Trust Center form,click Trusted Location,
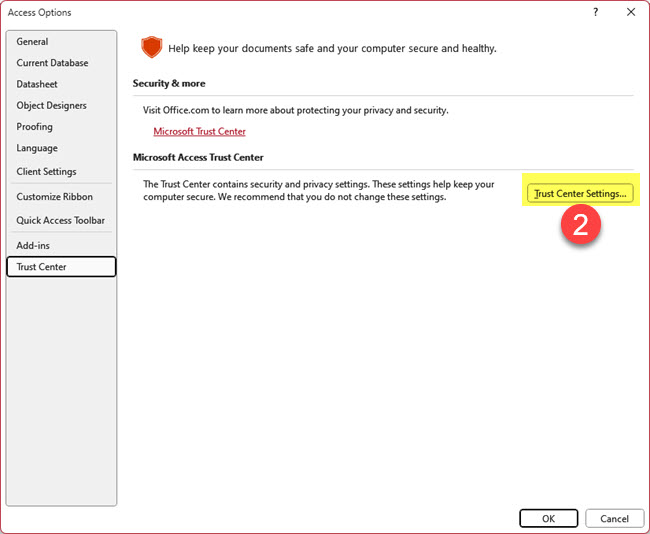
4. In the Trust Center form, click Trust Center Settings,

5. In the Trust Center form, click Trusted Locations on the top left.
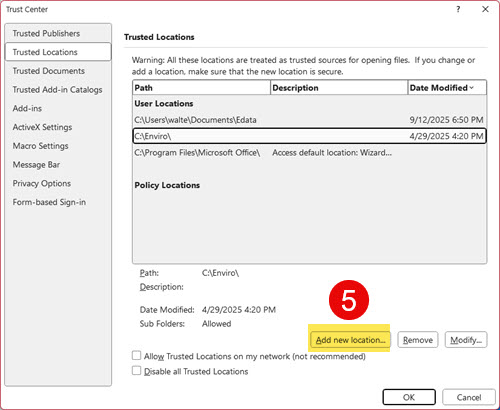
6. In the Microsoft Office Trusted Location form, click 5. Browse, 6. locate and select the folder, 7. check the box for Subfoldersof this trusted location are also trusted,, and finally, 8. click OK.
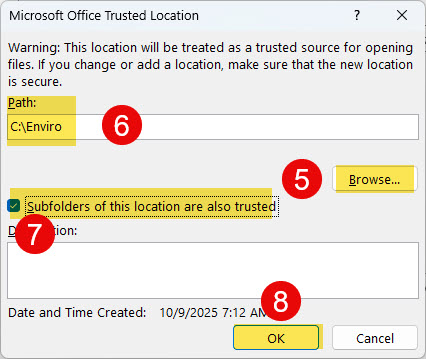
This will take you back to the Trust Center form to click OK.
Back in the Access Options form click OK again.
The default folder for the Enviro Data files is C:\Enviro\Edata8. There are desktop icons to run the programs: EDITOR, and VIEWER.
The Enviro Data system consists of many program and data files. These are Access format databases that contain user settings, program file, a blank databases for creating subsets, export files, or saved validation data files.There are also Excel files used a examples for the Tour and training.
The main Access files include: but is not limited to:
EnvDAdmin.mdb: This is the EDITOR program for building databases. Data administrators can use the program to import, edit, and review data.
EnvDView.mdb: This is the VIEWER program for selecting and retrieving data.
EnvDData8.mdb: This is a sample database provided by Geotech for users and administrators to learn and practice with.
Settings8.mdb: This file remembers the last database attachment and other control information, and stores saved queries by user. These are separated from the program file so that they are not overwritten during installation of program upgrades.
BlankDB8.mdb: This file is an empty copy of the database. The program uses this file to place data selected by you into a subset database, to create a new database with the lookup tables populated, or to create a reference file to send to your laboratory.
DataDB.mdb: This file contains an empty ValidationImport table used for saving validation data sets.
ExportDB.mdb: This file is an empty database used by the Access One Line Table export.
Controls8.mdb: This file contains copies of tables from the Settings file for use during program upgrades.
Template files:: These are Exce; files containing code used to create the crosstab. grpaphs, and other export files in Excel. While these can be user edited, we recomment you do not modify without speaking to Geotech support.
System administrators create ODBC (client-server) databases, which can be company-wide or project specific. The database contains tables and relationships in the format described in Appendix A, Data Model of the documentation.
Access database file locations are dependent on the computer type, maintenance requirements, and local area network setups/performance issues. Each user requires his or her own copy of the Access program and support files, including EnvDAdmin.mdb, EnvDView.mdb, Settings8.mdb, BlankDB8.mdb, DataDB.mdb, and ExportDB.mdb, to run the program and save individual user settings. However, network design and resulting performance of the program may require that files be loaded locally, with a corresponding increase in maintenance time requirements, but possibly quicker operation. It is NOT recommended to have a single shared copy of the program files on a network drive, and have multiple users share that set of program files. This will certainly lead to poor performance and may lead to data corruption.
The database files used to store your data (as opposed to program files) can be located on a local or network machine, depending on database type. An Access data file can be located on an individual machine or on a server for multi-user access. To use a SQL Server or Oracle database, an ODBC data source must be created on the client computer for each database to be used by that client. An ODBC database is usually located on a server. ODBC databases are often located in, and managed by, your Information Technology or similar department.
Enviro Data supports placing the database files on a server, most commonly using Microsoft’s SQL Server or Oracle. Note that only server versions still under active manufacturer’s support can be supported by Geotech.
Note that If you will be connecting to a server database such as SQL Server or Oracle, you need to place your database on the server in the correct format and then create an ODBC system data source on your computer. An ODBC data source includes the network path to the data that the user wants to access, and the information needed to get that data. Multiple data sources can be entered into the Control table in Enviro Data and can be selected by users from the ATTACH DATABASE form in either the EDITOR or VIEWER.
The steps to create an ODBC connection in Enviro Data, can be found in How to Create an ODBC Connectio to SQL Server.
This is rare and typically only happens after Geotech Support has provided an updated version of the Editor or VIewer that may have been built on a different version of Office.. however, this may also happen after a Microsoft Windows or Office update. In either case, we rstrongly ecommend contacting Geotech Support for assistance.
When Enviro Data is installed, it uses specific versions of MS Office "reference libraries" on your computer. If Office or a component of Enviro Data like the Editor or Viewer is changed, you might receive an error similar to the one below. You may should also see another error with an option of Debug the issue.
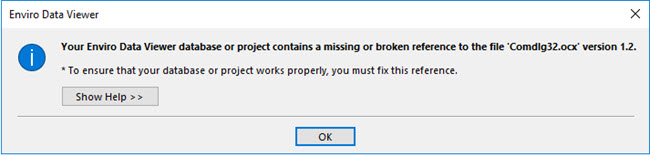
The instructions for fixing this are straight forward and listed below. However, if you feel uncomfortable with these instructions, or run into a problem while following them, we will be happy to do it for you, Just contact us at
Note that if you encountered this issue after upgrading your version of Office you may have to run these steps for both the Editor and the Viewer. Because we are constantly making improvements to Enviro Data, if you are running an older copy of Enviro Data, this may be a good time to install the current version. Contact us for a link to the latest version, download it, and install it using the Repair Install option.
1. On the popup error message, click Debug to start the VBA Editor but it may take a few moments to open. (Note that occasionally it will open under other programs and you will need to click on the icon on the task bar bring it to the front.)
Note that if the VBA Editor does not start, go into the Enviro\EData8 directory and hold the Shift key down while double-clicking the EnvDAdmin.accdb or EnvDView file. Once the file is open, Press F11 and go to Modules. Open the Attachments module in Design View. From there you should be able to go to Tools --> References.
2. Once the VBA Editor opens, click on the square Reset button (just below Tools in the Menu) to stop the code from running.
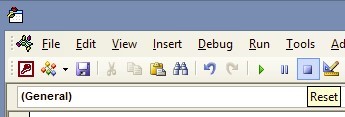
3. Next click on Tools and then References to open the References form.
4. Scroll down and look for any references with the word “MISSING" in front of them and uncheck them. These will be like "MISSING: Microsoft Excel xx Object library” reference. There may be more than one reference marked Missing and you need to uncheck each of them. Make a note of the ones you unchecked for use in the next step. Note, these entries may have a different version number than the “15” shown below.
5. Scroll down and find the version of the Microsoft Excel Object Library and any others that were "Missing" from step 4 and put a check in each one.
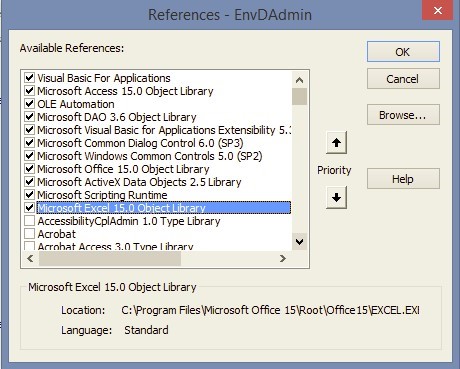
6. Click OK to close the References form.
7. Go to the Debug section of the VBA menu and click on Compile (EnvDView or EnvDAdmin).
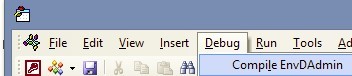
8. Once the Compile is complete, click Save it and close the VBA window.
9. Back in Enviro Data, reattach to your database.
Yes! Enviro Data regularly reads and writes to the folder it is installed in, C:\Enviro\EData8. The settings chosen in many of Enviro Data's forms save their properties in the Settins8 file located in ths folder. Additionally, the license file is stored in this folder.
In order for Enviro Data to work properly and be licensed, you must provide full Read / Write privileges in the C:\Enviro\ folder. Some may ask why C:\Enviro needs privileges, and not just the program folder EData8. While it is not specifically necessary, when a new number version of Enviro Data is released, it will be installed in C:\Enviro\Edata9 or similar folder, so it is best to simply make the whole C:\Envior folder have the same rights now rather than wait for a future issue to arise.
While your own personal computer (one not setup on a company network by an IT Dept.) generally does not need these rights, however, a computer or VM setup by an IT Department generally does, and Enviro Data requires Full Admin privileges to its own folder. (This is one of the reasons Enviro Data in a company environment must be setup using Admin Rights.)
The instructions to make these changes are below. (Note that the look of your computer's forms may be slightly different from the ones below depending on the version of Windows you are using.)
1. Open the Windows File Explorer form.
2. Click on This PC.,
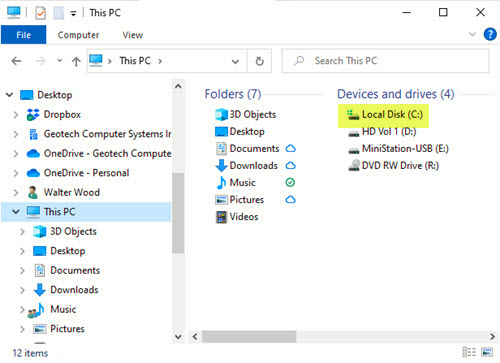
3. Click on Local Disk C.
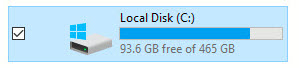
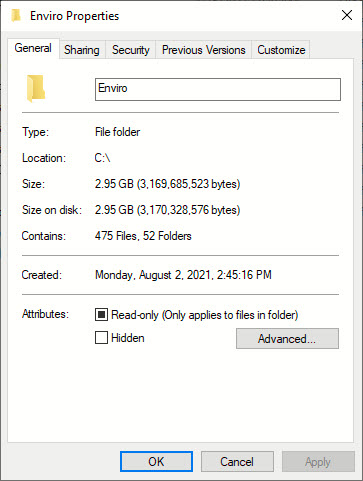
4. Find the C:\Enviro folder and right-click on it, then choose Properties as shown below to open the Enviro Properties form.
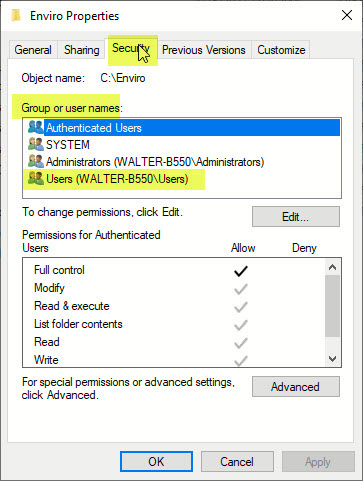
5. Click the Security tab.
6. Under "Group or user names:" click on Users (xxxxxx\Users) as shown below (where xxxxxx is the name of the computer).
7. Under "Permissions for [Authenticated] Users", in the Allow column, click the check box "Full Control".
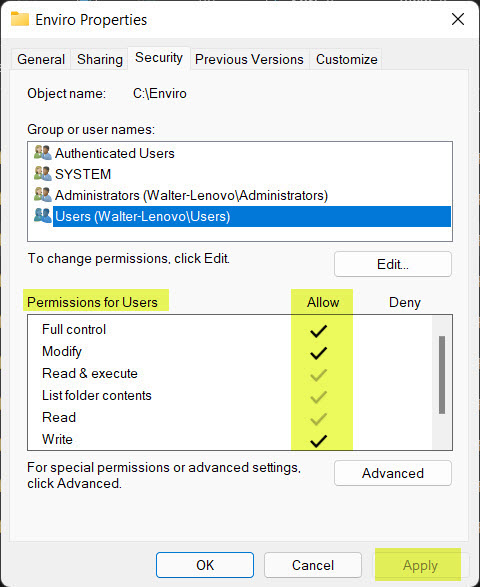
8. Before leaving the Enviro Properties form, click the Apply button in the lower-right and review to see that Full Control has been applied.
9. Click OK to save the settings.
Maintaining a backend Access database—especially in a split architecture like Enviro Data uses—requires a blend of vigilance, automation, and structural discipline. Here's a comprehensive rundown tailored to your environment:
Core Maintenance Best Practices
Compact & Repair Regularly
• From either the Editor or Viewer run Clear Temporary Tables, found under Maintain Database
• Compact and Repair can be run from the Access Menu by clicking on Database Tools and then Compact & Repair.
.• It must be run on the backend database and not from Enviro Data however, it can also be run in Enviro Data to fix any potential program issues.
.• Prevents bloat and fragmentation.
• Schedule it during off-hours and it cn also be run using a utility database or script.
• Ensure no active connections (check that there are no .laccdb lock files present).
Backup Strategically
• Daily incremental backups + weekly full backups.
• Automate backups with PowerShell or Task Scheduler.
• Store backups offsite or in cloud storage with versioning.
•You should also back up your Settings8.mdb file since it is also linked to Enviro Data.
Monitor File Size & Growth
• Access has a 2GB limit per .accdb file.
• Track growth trends and archive old data if needed.
Security & Access Control
Restrict Permissions
• Backend should reside on a secure network share with limited write access.
• Use NTFS permissions to control who can read/write/delete.
Encrypt & Password-Protect
• Apply encryption via Access’s built-in password feature. It used to be true that if you enabled the Access security it would apply to all Access files. Maybe it works better now.
• Consider encrypting the network share or using BitLocker for sensitive data.
Audit Access & Changes
• Use logging tables or external audit tools to track who accessed what and when.
• Especially useful for regulatory compliance or client-facing systems.
Structural Integrity
Avoid Direct Access to the Backend Tables
• Use stored queries or pass-through SQL for complex operations.
• Prevent users from interacting directly with backend tables.
• DO NOT STORE YOUR DATABASE FILES IN ONEDRIVE, SHAREPOINT. OR DROPBOX. See here for more information.